2021-05-18 12:21:48 +00:00
|
|
|
---
|
|
|
|
|
title: First-time ThinkPad X200 flashing
|
|
|
|
|
x-toc-enable: true
|
|
|
|
|
...
|
|
|
|
|
|
2024-01-27 22:35:38 +00:00
|
|
|
NOTE: Libreboot standardises on [flashprog](https://flashprog.org/wiki/Flashprog)
|
|
|
|
|
now, as of 27 January 2024, which is a fork of flashrom.
|
|
|
|
|
|
2023-04-21 01:09:40 +00:00
|
|
|
**If you haven't bought an X200 yet: the [Dell Latitude
|
|
|
|
|
E6400](../../news/e6400.md) is much easier to flash; no disassembly required,
|
|
|
|
|
it can be flashed entirely in software from Dell BIOS to Libreboot. It is the
|
|
|
|
|
same hardware generation (GM45), with same CPUs, video processor, etc.**
|
|
|
|
|
|
2022-11-14 02:31:12 +00:00
|
|
|
This guide is for those who want libreboot on their ThinkPad X200 while
|
2021-05-18 12:21:48 +00:00
|
|
|
they still have the original Lenovo BIOS present. This guide can also be
|
|
|
|
|
followed (adapted) if you brick your X200, to know how to recover.
|
|
|
|
|
|
|
|
|
|
If you have the original Lenovo firmware running, you will need to take the
|
|
|
|
|
keyboard and palmrest off so that you can access the flash chip, which is just
|
|
|
|
|
underneath the palm rest. You will then connect an external SPI programmer, to
|
|
|
|
|
re-flash the chip externally while it is powered off with the battery removed.
|
|
|
|
|
|
|
|
|
|
NOTE: This guide only applies to the regular X200. For X200S and X200 Tablet
|
2022-11-14 02:31:12 +00:00
|
|
|
flashing, please read other guides available on libreboot.org.
|
2021-05-18 12:21:48 +00:00
|
|
|
|
|
|
|
|
Flash chip size
|
|
|
|
|
===============
|
|
|
|
|
|
|
|
|
|
Run this command on x200 to find out flash chip model and its size:
|
|
|
|
|
|
2024-01-27 22:35:38 +00:00
|
|
|
flashprog -p internal
|
2021-05-18 12:21:48 +00:00
|
|
|
|
|
|
|
|
MAC address
|
|
|
|
|
===========
|
|
|
|
|
|
|
|
|
|
Refer to [mac\_address.md](../hardware/mac_address.md).
|
|
|
|
|
|
|
|
|
|
The procedure
|
|
|
|
|
-------------
|
|
|
|
|
|
|
|
|
|
This section is for the X200. This does not apply to the X200S or X200
|
|
|
|
|
Tablet (for those systems, you have to remove the motherboard
|
|
|
|
|
completely, since the flash chip is on the other side of the board).
|
|
|
|
|
|
|
|
|
|
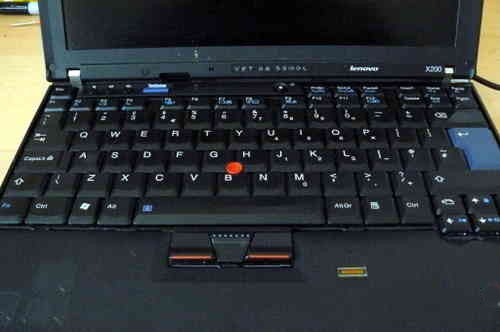
Remove these screws:\
|
|
|
|
|
|
|
|
|
|
|
|
|
|
|
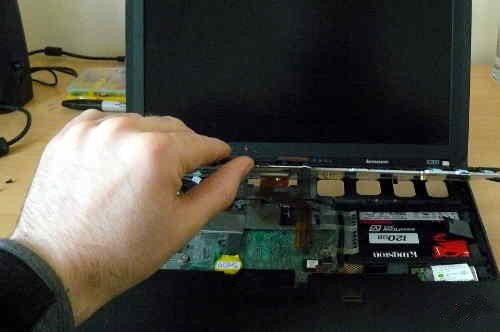
Gently push the keyboard towards the screen, then lift it off, and optionally
|
|
|
|
|
disconnect it from the board:\
|
|
|
|
|
|
|
|
|
|
|
|
|
|
|
|
|
|
|
|
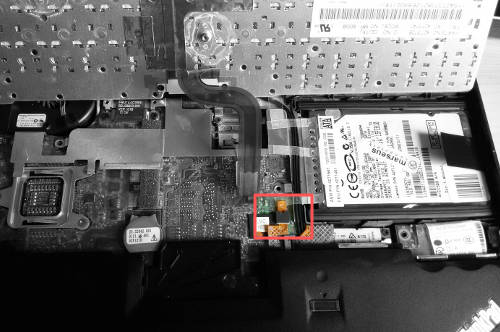
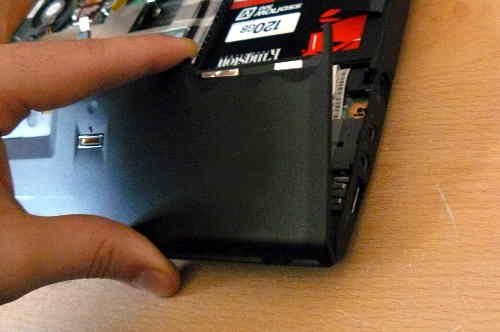
Disconnect the cable of the fingerpring reader, and then pull up the palm rest,
|
|
|
|
|
lifting up the left and right side of it:\
|
|
|
|
|
|
|
|
|
|
|
|
|
|
|
|
|
|
|
|
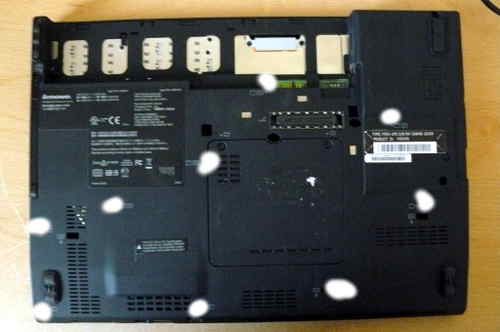
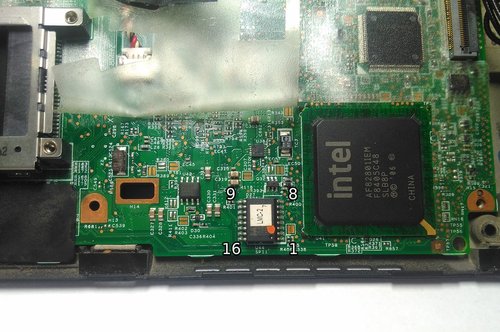
This shows the location of the flash chip, for both SOIC-8 and SOIC-16:\
|
|
|
|
|
|
|
|
|
|

|
|
|
|
|
|
|
|
|
|
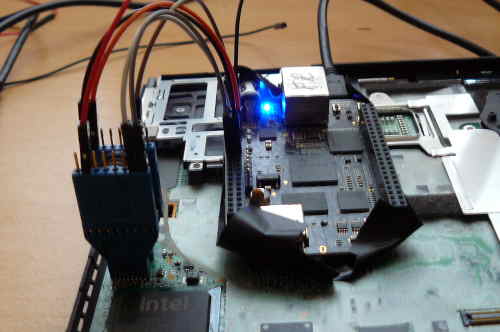
Lift back the tape that covers a part of the flash chip, and then
|
|
|
|
|
connect the clip:\
|
|
|
|
|
|
|
|
|
|
|
2022-11-14 02:31:12 +00:00
|
|
|
Now, you should be ready to install libreboot.
|
2021-05-18 12:21:48 +00:00
|
|
|
|
|
|
|
|
Refer to the [SPI programming instructions](spi.md).
|
|
|
|
|
|
|
|
|
|
When you're done, put the system back together. If it doesn't boot, try other
|
|
|
|
|
RAM modules because raminit is very unreliable on this platform (in coreboot).
|
|
|
|
|
|
|
|
|
|
Memory
|
|
|
|
|
======
|
|
|
|
|
|
|
|
|
|
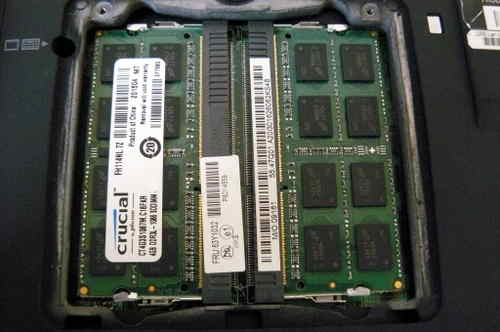
In DDR3 machines with Cantiga (GM45/GS45/PM45), northbridge requires sticks
|
|
|
|
|
that will work as PC3-8500 (faster PC3/PC3L sticks can work as PC3-8500).
|
|
|
|
|
Non-matching pairs may not work. Single module (meaning, one of the slots
|
|
|
|
|
will be empty) will currently only work in slot 0.
|
|
|
|
|
|
|
|
|
|
NOTE: according to users reports, non matching pairs (e.g. 1+2 GiB) might
|
|
|
|
|
work in some cases.
|
|
|
|
|
|
|
|
|
|
Make sure that the RAM you buy is the 2Rx8 configuration when buying 4GiB sticks
|
|
|
|
|
(In other words: maximum of 2GiB per rank, 2 ranks per card).
|
|
|
|
|
|
|
|
|
|
In this photo, 8GiB of RAM (2x4GiB) is installed:
|
|
|
|
|
|
|
|
|
|
|
|
|
|
|
|
|
|
|
|
Boot it!
|
|
|
|
|
--------
|
|
|
|
|
|
|
|
|
|
You should see something like this:
|
|
|
|
|
|
|
|
|
|

|
|
|
|
|
|
2023-04-09 21:57:42 +00:00
|
|
|
Now [install Linux](../linux/).
|
2021-05-18 12:21:48 +00:00
|
|
|
|
|
|
|
|
X200S and X200 Tablet users: GPIO33 trick will not work.
|
|
|
|
|
--------------------------------------------------------
|
|
|
|
|
|
|
|
|
|
sgsit found out about a pin called GPIO33, which can be grounded to
|
|
|
|
|
disable the flashing protections by the descriptor and stop the ME from
|
|
|
|
|
starting (which itself interferes with flashing attempts). The theory
|
|
|
|
|
was proven correct; however, it is still useless in practise.
|
|
|
|
|
|
|
|
|
|
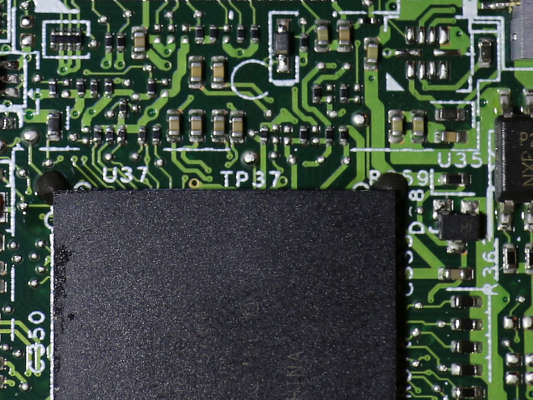
Look just above the 7 in TP37 (that's GPIO33):
|
|
|
|
|
|
|
|
|
|
|
|
|
|
|
|
2024-01-27 22:35:38 +00:00
|
|
|
By default we would see this in lenovobios, when trying flashprog -p
|
2021-05-18 12:21:48 +00:00
|
|
|
internal -w rom.rom:
|
|
|
|
|
|
2023-01-08 01:22:04 +00:00
|
|
|
```
|
|
|
|
|
FREG0: Warning: Flash Descriptor region (0x00000000-0x00000fff) is read-only.
|
|
|
|
|
FREG2: Warning: Management Engine region (0x00001000-0x005f5fff) is locked.
|
|
|
|
|
```
|
2021-05-18 12:21:48 +00:00
|
|
|
|
|
|
|
|
With GPIO33 grounded during boot, this disabled the flash protections as
|
|
|
|
|
set by descriptor, and stopped the ME from starting. The output changed
|
|
|
|
|
to:
|
|
|
|
|
|
2023-01-08 01:22:04 +00:00
|
|
|
```
|
|
|
|
|
The Flash Descriptor Override Strap-Pin is set. Restrictions implied by
|
|
|
|
|
the Master Section of the flash descriptor are NOT in effect. Please note
|
|
|
|
|
that Protected Range (PR) restrictions still apply.
|
|
|
|
|
```
|
2021-05-18 12:21:48 +00:00
|
|
|
|
|
|
|
|
The part in bold is what got us. This was still observed:
|
|
|
|
|
|
2023-01-08 01:22:04 +00:00
|
|
|
```
|
|
|
|
|
PR0: Warning: 0x007e0000-0x01ffffff is read-only.
|
|
|
|
|
PR4: Warning: 0x005f8000-0x005fffff is locked.
|
|
|
|
|
```
|
2021-05-18 12:21:48 +00:00
|
|
|
|
|
|
|
|
It is actually possible to disable these protections. Lenovobios does,
|
|
|
|
|
when updating the BIOS (proprietary one). One possible way to go about
|
|
|
|
|
this would be to debug the BIOS update utility from Lenovo, to find out
|
|
|
|
|
how it's disabling these protections. Some more research is available
|
|
|
|
|
here:
|
|
|
|
|
<http://www.coreboot.org/Board:lenovo/x200/internal_flashing_research>
|
|
|
|
|
|
|
|
|
|
Of course, it's likely that the Lenovo BIOS is checking for some bit in memory
|
|
|
|
|
that tells it not to disable flashing, and then it won't set PRx registers. The
|
|
|
|
|
way the Lenovo BIOS updater works is, it is executed in Windows first and then
|
|
|
|
|
a reboot happens, triggering the re-flashing to happen during early boot. It is
|
|
|
|
|
probably setting something in memory and loading the ROM, plus a payload program
|
|
|
|
|
that does the flashing; Lenovo BIOS then probably sees that and runs that, instead
|
|
|
|
|
of setting PRx and going for normal boot. It is theoretically possible that we
|
|
|
|
|
could discover how this works, by debugging the Lenovo BIOS update utility (in
|
2023-04-09 21:38:30 +00:00
|
|
|
Windows), and then replicate what it is doing, with some tool for Linux,
|
2024-01-27 22:35:38 +00:00
|
|
|
then load a flashprog binary into memory and the ROM to flash (for the BIOS
|
2021-05-18 12:21:48 +00:00
|
|
|
region). You would do this with GPIO33 grounded, and the payload program would
|
2022-11-14 02:31:12 +00:00
|
|
|
actually flash the entire chip, with just a normal libreboot image.
|
2021-05-18 12:21:48 +00:00
|
|
|
|
|
|
|
|
It's possible. The above is likely the only way that the Lenovo BIOS updater
|
|
|
|
|
program works. So if we discover precisely how to do that, then you could
|
|
|
|
|
just connect some pogo pins to ground GPIO33, then boot up, run some software
|
|
|
|
|
(which would have to be written) that does the above.
|
|
|
|
|
|
2022-11-14 02:31:12 +00:00
|
|
|
On a related note, libreboot has a utility that could help with
|
2021-05-18 12:21:48 +00:00
|
|
|
investigating this:
|
|
|
|
|
[ich9utils.md#demefactory](ich9utils.md#demefactory)
|