31 KiB
Please follow this prior to flashing, or you may brick your machine.
Please inject vendor files prior to flashing. You can also use this guide to change the built-in MAC address for your Intel Gigabit Ethernet device; doing so is advisable, because otherwise you will have a default, generic MAC address.
Absolutely unsigned Intel ME!
Libreboot already disables the Intel ME by default, using me_cleaner, but
the T480/T480s specifically have an additional quirk:
One of the benefits of deguard for Intel MEv11 is that it sets the ME in such a state where you can run unsigned code in there. This is how the Intel Boot Guard was disabled, because it is the ME that enforces such restrictions; more information about deguard is available on a dedicated page.
The deguard utility could also be used to enable the red-unlock hack, which would permit unsigned execution of new CPU microcode, though much more research is needed. Because of these two facts, this makes the T480/T480s the most freedom-feasible of all relatively modern x86 laptops.
With deguard, you have complete control of the flash. This is unprecedented on recent Intel systems in Libreboot, so it's certainly a very interesting port!
Libreboot uses both me_cleaner and deguard on the T480/T480s.
What works in this port:
Intel graphics, internal screen, ethernet, USB, WLAN, HDA verbs (e.g. headphone jack), S3 suspend/resume, M2 NVMe SSDs and SATA, all works perfectly. External video outputs and webcam also work. Microphone works, line-out works... everything works. UART also available via line-out jack (jumpers required on the mainboard).
There are a few minor exceptions as to what works; this will be covered in other sections of this page. This port is almost perfect, but with some caveats.
Build images from source
Please refer to the standard build instructions first.
The build target, when building from source, is thus:
./mk -b coreboot t480_vfsp_16mb
./mk -b coreboot t480s_vfsp_16mb
NOTE: The T480 and T480s may be similar, but they do have several critical differences in their wiring, so you MUST flash the correct image. Please choose one of the above build targets accordingly.
Installation
Insert binary files (DO THIS FIRST)
If you're using a release ROM, please ensure that you've inserted extra firmware required. Refer to the guide for that. (failure to adhere to this advice will result in a BRICKED machine)
Libreboot's build system automatically downloads and processes these files if you build Libreboot from source, but the same logic that it uses must be re-run if you're using a release image. This is to bypass certain restrictions on direct distribution, for files such as the Intel Management Engine firmware.
The pre-compiled images do not contain an Intel ME, so you must first insert it
using the above guide. Libreboot's build system automatically grabs it, disables
it after boot with me_cleaner, and configures it with deguard
to disable the Intel Boot Guard - this automation is either applied at build
time, or you can use it on release images.
Again:
If you're building from source via Libreboot's build system, these files are inserted during build. You only need to manually insert them, using the above linked guide, on the pre-compiled release images!
Set MAC address
This platform uses an Intel Flash Descriptor, and defines an Intel GbE NVM region. As such, release/build ROMs will contain the same MAC address. To change the MAC address, please read nvmutil documentation.
NOTE: If changing the MAC address, please give ifdtool the following
argument when using it: --platform sklkbl - otherwise, ifdtool will
handle the IFD incorrectly!
Thunderbolt issue (READ THIS BEFORE FLASHING)
The thunderbolt firmware on launch units had a bug where certain debug info is written on certain events, such as plugging in a charger to the USB-C connector. Log data is stored in the Thunderbolt firmware's own SPI flash, which is separate from the main SPI flash containing the system firmware e.g. coreboot.
This photo shows that flash chip on a ThinkPad T480:
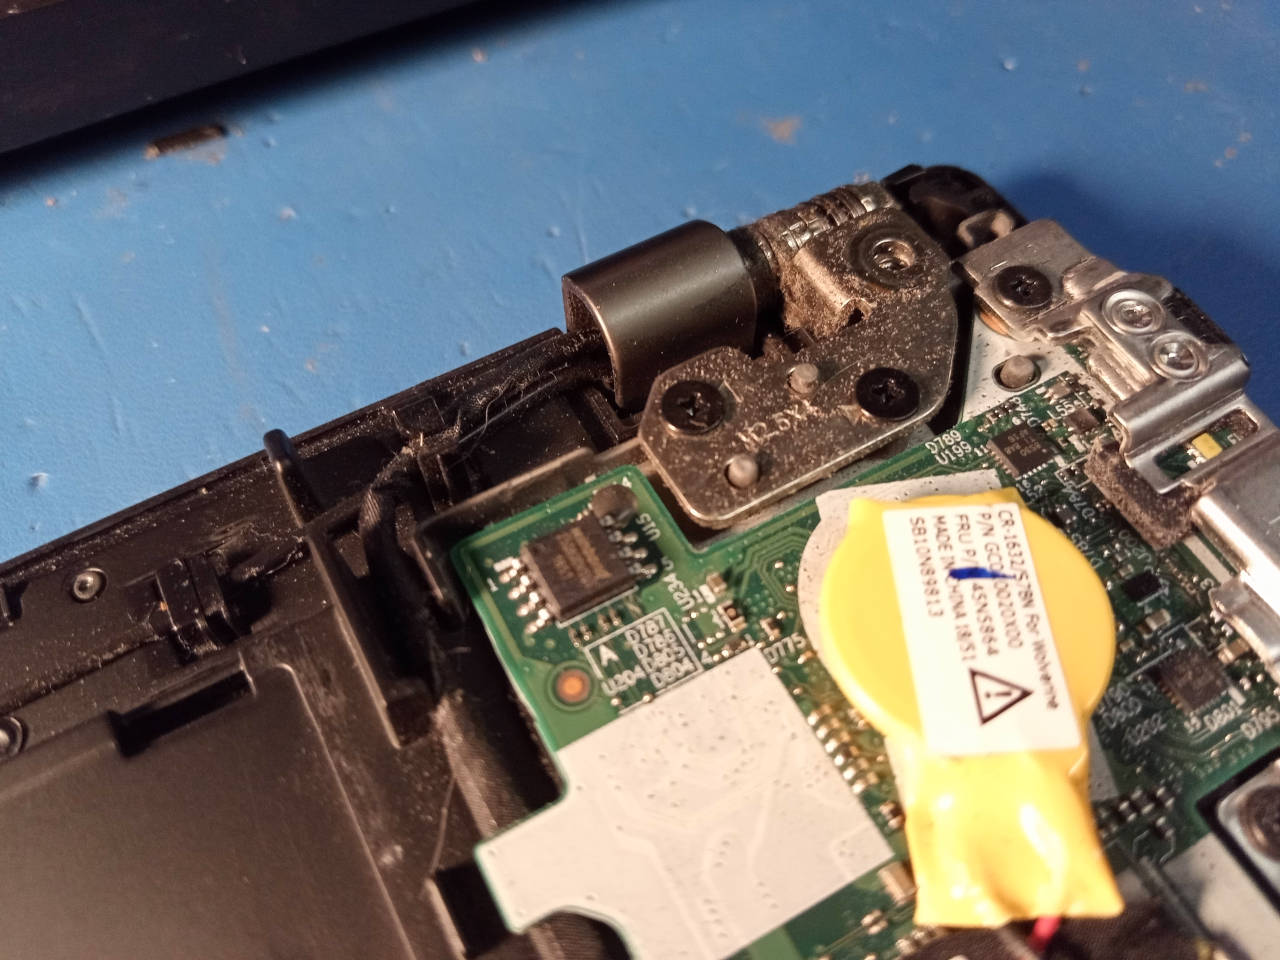

It's also present on the T480S (S model), but in a different location; on the S model, the main system flash is still located somewhere near the centre of the board, and the ThunderBolt flash near the edge of the board, as it is on the T480, but the T480/T480s use slightly different wiring and they have a slightly different board layout.
If that flash gets full, thunderbolt PCI-E stops working and fast charging stops working, but slow charging still works. The issue can be prevented by updating the firmware. See:
If you're already affected by the bug, you can restore it to a working state by flashing the Thunderbolt firmware externally. You cannot fix the issue with Lenovo's software-based flasher, if the issue is already present, so you must flash externally in that case; you can also flash externally, even if the issue is not yet present.
The benefit of flashing it externally is that you would then no longer need to boot Windows, because there is currently no way of doing it from Linux, and Lenovo does not provide a boot image like they do for UEFI updates. So, to use Lenovo's software-based flasher, you must install and boot Windows. We always recommend using Free Software whenever possible, so we always recommend flashing the new firmware externally, as a matter of course.
Use the 25XX NOR flashing guide if you need to flash this chip. It's the same guide that you will use for the main system flash, which is a separate flash IC.
The firmware can be extracted from Lenovo's updater, specifically the .exe
file. For your convenience, lbmk (Libreboot's build system) can download this
for you. Run the following commands in lbmk:
(please install build dependencies first)
Commands:
./mk -d coreboot t480s_vfsp_16mb
./mk -d coreboot t480_vfsp_16mb
You will find the files at these locations in lbmk:
vendorfiles/t480/tb.binvendorfiles/t480s/tb.bin
These have already been padded, to the correct size of 1MB, whereas the original
size (within the .exe file) was 256KB.
These files are also generated, if you used the ./mk inject command,
on a pre-compiled release image, as documented here.
WARNING: DO NOT FLASH IT FIRST; YOU MUST PERFORM SOME PRE-REQUISITE STEPS
FIRST, BEFORE FLASHING tb.bin:
Firstly, please note that this procedure has only been tested with Lenovo's UEFI firmware installed on the main flash. Please ensure that you have also switched Lenovo UEFI/EC firmware to the specific version referenced on this page, for your board. - for the rest of this, we will assume that you've not yet flashed Libreboot, though there's no reason in principle why this can't also work after you've flashed Libreboot; it's just that we only tested it from Lenovo UEFI firmware.
Now, remove the CR2032 battery (yellow coin-cell battery). Please also ensure that you've disabled ThunderBolt Assist in the Lenovo UEFI setup menu. You should also disable the internal battery, on T480 specifically (T480s only has an internal battery). You should do this with no batteries connected anyway.
Firstly, make two dumps of the flash, using flashprog - and the
linked guide generally tells you how to dump/flash the chip. Make sure both
dumps have the same checksum, using e.g. sha512sum.
Now, erase the flash. This example command is when using a Raspberry Pi Pico,
assuming that the device shows up as /dev/ttyACM0 - please adapt accordingly
to whatever programmer you have:
flashprog -p serprog:dev=/dev/ttyACM0 -E
Note that the -E argument is what specifies that the chip should be erased.
Now, you must create a file called null.bin, which contains all zeroes:
dd if=/dev/zero of=null.bin bs=1M count=1
Please ensure (in hexdump) that the file does contain all zeroes, and that it is 1MB in size. You will now flash it, again adapting the command below to whatever programmer you have:
flashprog -p serprog:dev=/dev/ttyACM0 -w null.bin
NOW, REMOVE the clip. Button it back up and turn the T480 on, with both the battery and the charger connected, plugging in the battery first.
It should boot up and show the Lenovo boot screen. Give it a few moments. When you've confirmed that it has booted the Lenovo firmware, shut down the machine and remove the battery / power supply again. It may take a while to boot Lenovo's firmware when doing this, so please be very patient.
After you've confirmed that the machine boots, I say again: make sure to shut it down fully, removing all batteries and power supplies.
It is at this moment that you will externally flash the tb.bin file. Please
make sure to flash the correct one for your board:
- T480:
vendorfiles/t480/tb.bin - T480s:
vendorfiles/t480s/tb.bin
Libreboot's automated build system has a lot more dependencies. If you want to
avoid installing them, and extract the file manually, you can. Simply download
the .exe file and do this:
innoextract filename.exe
The innoextract utility will probably be available in your distro's package
manager. You can otherwise find it here:
https://constexpr.org/innoextract/ - credit goes to Daniel Scharrer for
writing this excellent software.
A directory will be created with the extracted files. Inside it, you will
find a file named TBT.bin. You can pad it like so:
dd if=/dev/null of=TBT.bin bs=1 seek=1048576
Note that the seek variable here matching 1MB flash size. If you encounter
a different flash size, adapt accordingly (the same applies when creating
the null.bin file). Libreboot's build system makes this size configurable
per board, on the theory that we may encounter other flash sizes in the future,
when we add more ThinkPads of this generation to Libreboot.
Ok, so you have the file. Now you can flash it.
Example:
flashprog -p serprog:dev=/dev/ttyACM0 -w tb.bin
Adapt tb.bin in the command above, to the actual one that you wish to flash.
You MUST do it in the exact order as prescribed above. After flashing
the tb.bin image, un-clip and simply re-assemble. After you boot up, it should
once again show the boot screen, and USB-C / ThunderBolt will work perfectly.
You can repeat the above steps to restore the old firmware version. This is why you were instructed to make a backup, on the off-chance that you may wish to do so for some reason in the future.
Troubleshooting:
If you accidentally flashed an incorrect firmware image, or you didn't properly erase and boot first before flashing the new image, you can simply repeat the steps again; on erase/null, you then boot up and wait and it'll eventually show the boot screen again. If it doesn't work, just keep doing it until it does.
Credits go to Adam McNutt who originally provided such instructions, for the ThinkPad T480. The information there was adapted for this guide, in the Libreboot documentation. Libreboot may very well support other ThinkPads from the same generation, in a future release after Libreboot 20241206, and many of those have this same issue; when it does, Libreboot will document this fix for those machines too, and probably move these instructions to a dedicated page on the website.
Flash a ROM image (software)
If you're already running Libreboot, and you don't have flash protection turned on, internal flashing is possible.
The default Libreboot setup removes all flash restrictions, allowing you to flash internally, from a Linux or BSD systems running on the T480/T480. You must also disable /dev/mem protections for internal flashing to work.
Flash a ROM image (hardware)
First, please assimilate all knowledge in the 25XX NOR flashing guide - it shows how to program these flash chips, using a dedicated flash programmer, which is something that you will physically connect to the flash chip.
Again: this is only necessary if you have Lenovo BIOS, or if you enabled flash write protections on an existing Libreboot setup.
MAKE SURE to update the Lenovo UEFI firmware before installing Libreboot. You must also make a dump of the NOR flash, before updating Lenovo's firmware, and once again before flashing Libreboot, being sure you have good dumps.
T480: Make sure to use the n24ur39w release, when updating Lenovo firmware.
Or downgrade to this version. This is because the EC UART support in coreboot
specifically taps into the EC code of that release. See:
https://download.lenovo.com/pccbbs/mobiles/n24ur39w.html
and it can be downloaded here:
https://support.lenovo.com/us/en/downloads/ds502355-bios-update-utility-bootable-cd-for-windows-10-64-bit-linux-thinkpad-t480
NOTE: T480s (S model) doesn't have EC UART support yet, so it doesn't matter
yet which version you update to on the S model.
Prep a USB stick with it:
geteltorito -o t480_bios_update.img /path/to/your/downloaded.iso
Now DD it to the raw USB flash device:
dd if=t480_bios_update.img of=/dev/sdX bs=4M conv=fsync status=progress
You must disable SecureBoot, and enable legacy/CSM boot, and boot it in BIOS mode, not UEFI mode. Make sure your battery is well-charged, and boot it with a battery and with the power supply plugged in. Select option 2 in the menu, to update your BIOS, which also updates the EC firmware. This is the Lenovo BIOS/UEFI updater. Once you've updated, you can flash Libreboot.
Please ensure also that you've already dealt with the Thunderbolt issue, which is described above. After all of this, you can flash Libreboot.
Find videos online of how to disassemble this, and/or find Lenovo's own service manual online. Otherwise, observe:
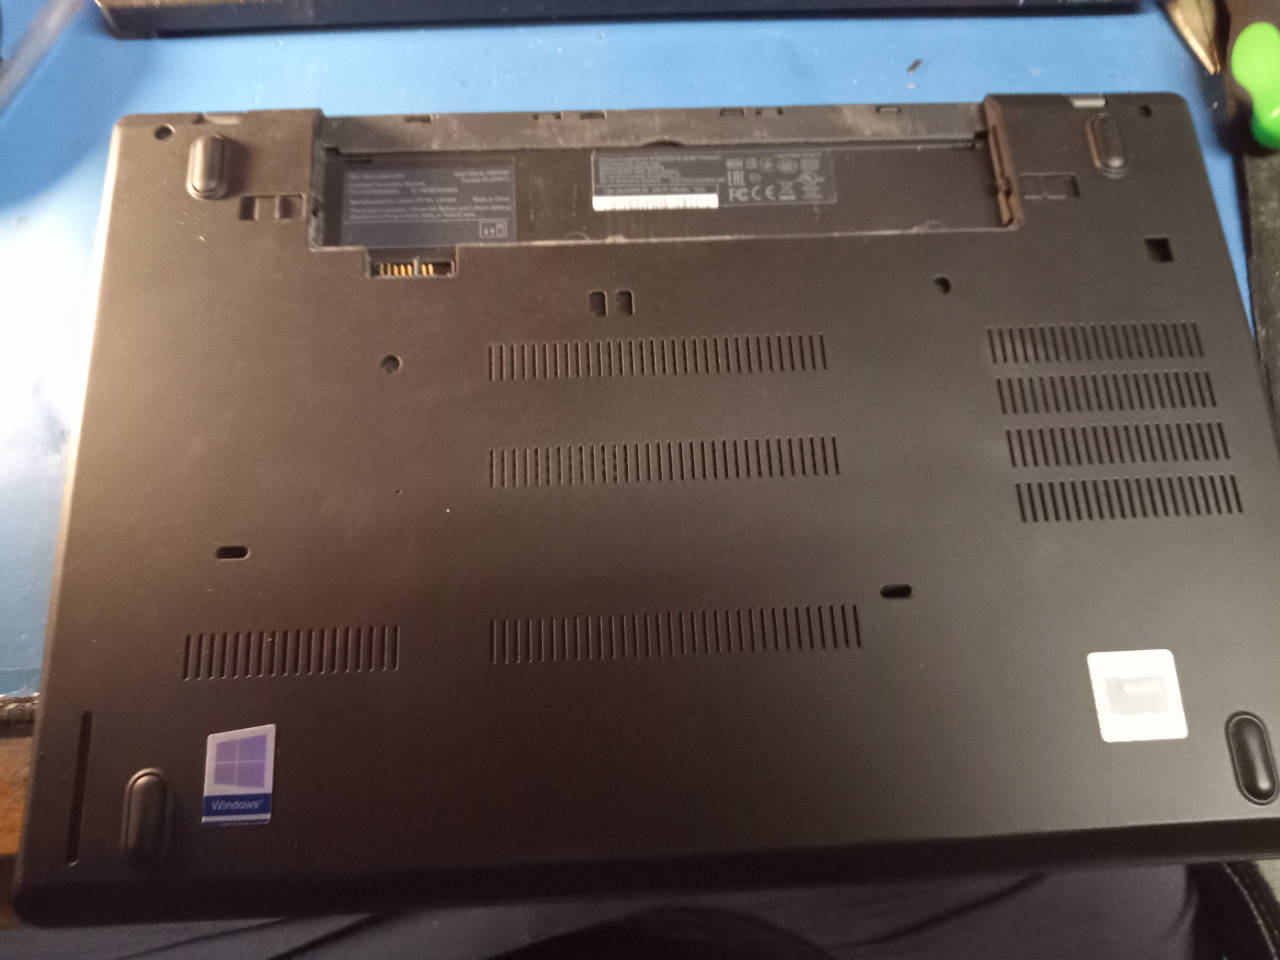

Remove all screws, and you can gently pry off the lower chassis and remove, which then allows you to see the inner mainboard:
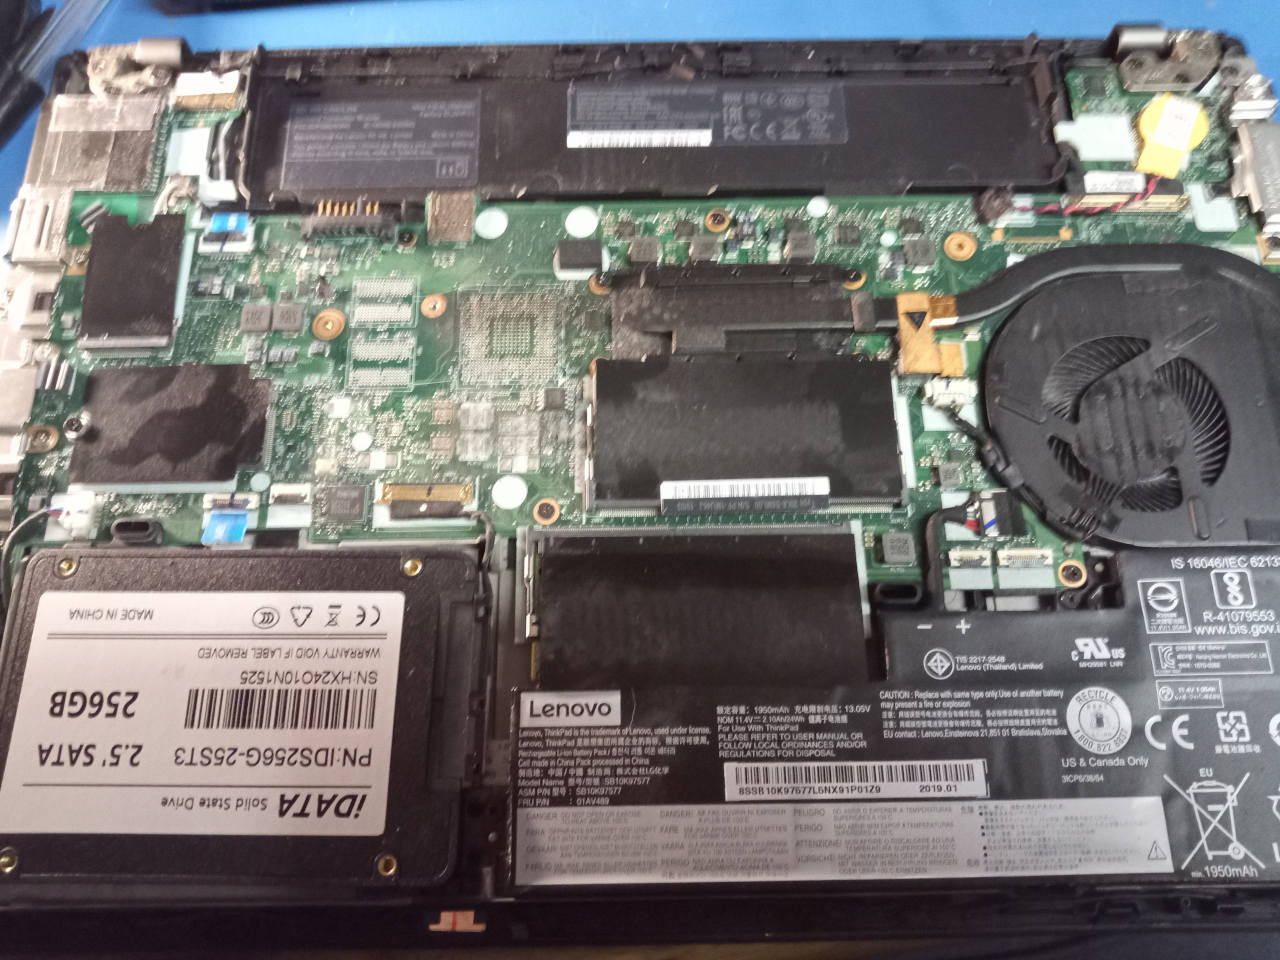

WARNING: PLEASE MAKE SURE to remove the battery before flashing. The T480 and T480s can both contain INTERNAL batteries, and the T480 has an additional external battery. Remove the internal battery via the connector, like so (T480):
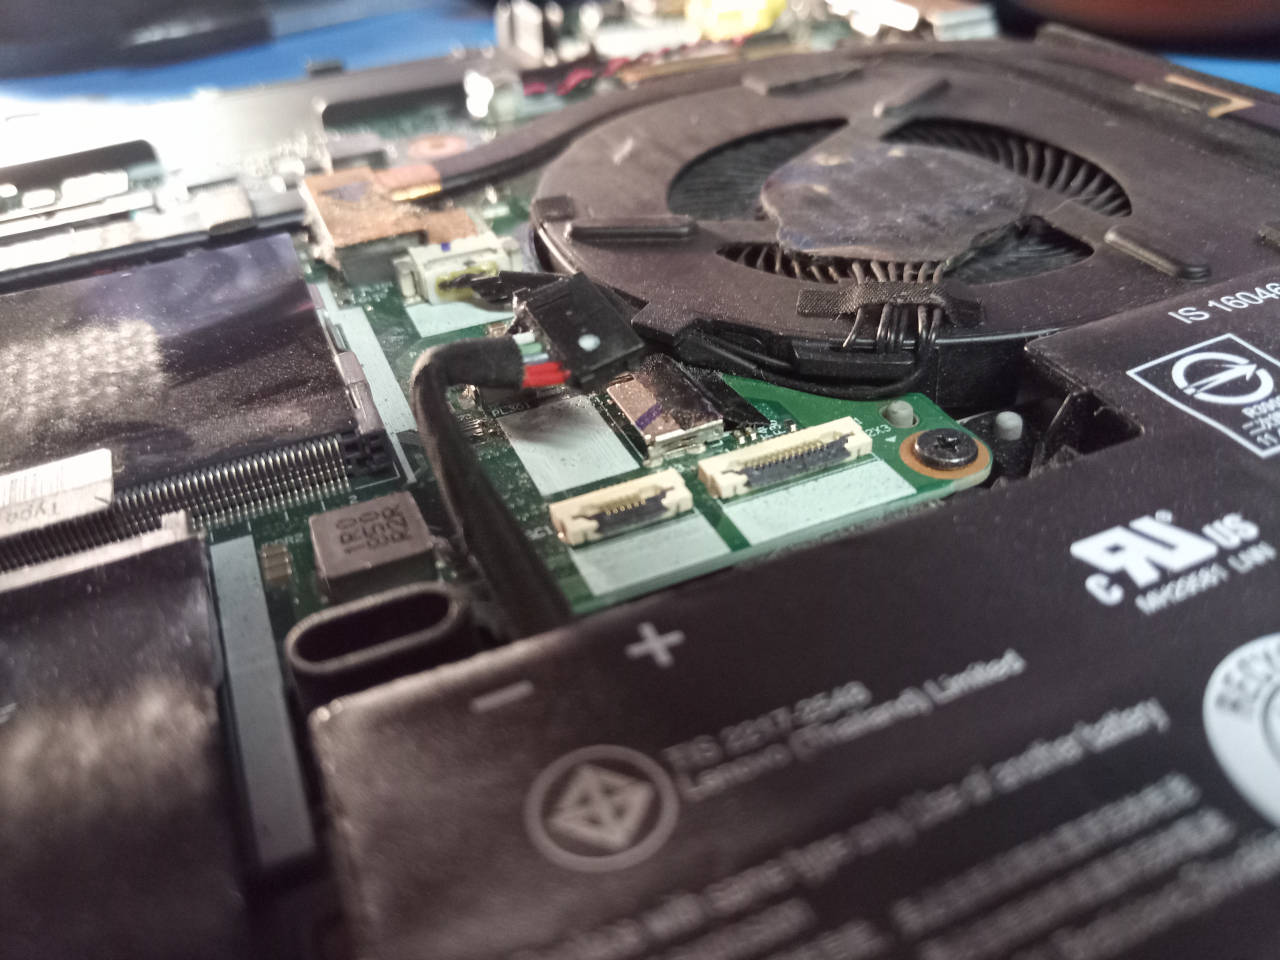

On the T480s (S model) the internal battery is much larger, and the connector on it is built into the battery, so it is necessary to carefully remove the entire battery; on regular T480 (non-S model) the internal battery can be isolated via the connector as depicted above.
This photo shows the flash:
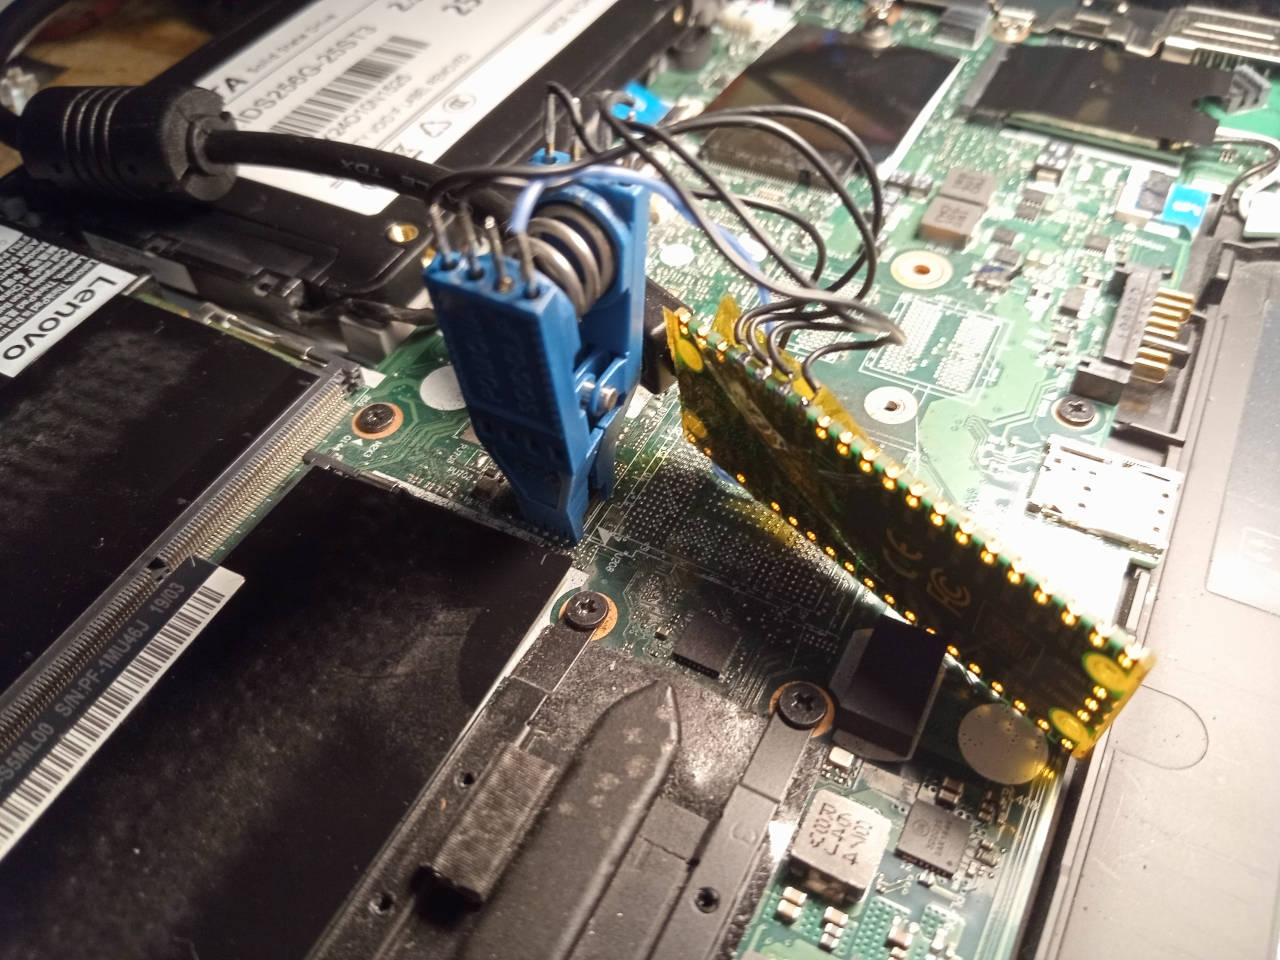

There is another flash, for the Thunderbolt firmware, which you are to briefly ignore; we'll cover it later:


To be clear: the system flash (16MB) is what you put Libreboot on. The Thunderbolt firmware flash is much smaller, so you'll know because flashprog will complain about wrong flash size if you're trying to flash the wrong one.
On the T480s (S model), the flashes are in slightly different places but in both machines, the system flash (for Libreboot) is toward the centre, near the memory.
Post-installation
These next sections will tell you how to use certain hardware features, which work a little bit differently due to idiosyncrasies of coreboot.
How to use the headphone jack
Sometimes the headphone jack might not work automatically. Simply install
the pavucontrol program. Under Output Devices, you can select the headphones
you've inserted manually.
If it says "Unplugged", try it anyway. The HDA Verb may be incorrect. This will be investigated and a hotfix patch made to the Libreboot 20241206 images.
How to use HDMI audio
You can get audio from Displayport/HDMI, but you must select it manually.
For example, you can select it in pavucontrol if you're using PulseAudio or
PipeWire.
Touchscreen on T480
The touchscreen was tested, and confirmed working. Not all models have it, but it does indeed work perfectly on ones that do.
How to use backlight controls
Backlight controls work, via software control (e.g. xbacklight utility), but
the Fn keys for it don't currently work, as of 6 December 2024.
You can set the backlight manually, or use a hotkey, depending on your window manager or desktop environment.
UART (T480 only. Not T480S)
NOT supported on the S model (T480s). Please only do it on a T480.
The EC on ThinkPad T480 has a UART available, and it is enabled in coreboot, as used by Libreboot. However, you must use a specific EC firmware version. Please read notes elsewhere in this page regarding Lenovo UEFI/EC BIOS updates; an exact version number is referenced, which you must install prior to Libreboot installation.
Ways to flash the EC firmware from Libreboot have not yet been established. Now, please observe the following photo:
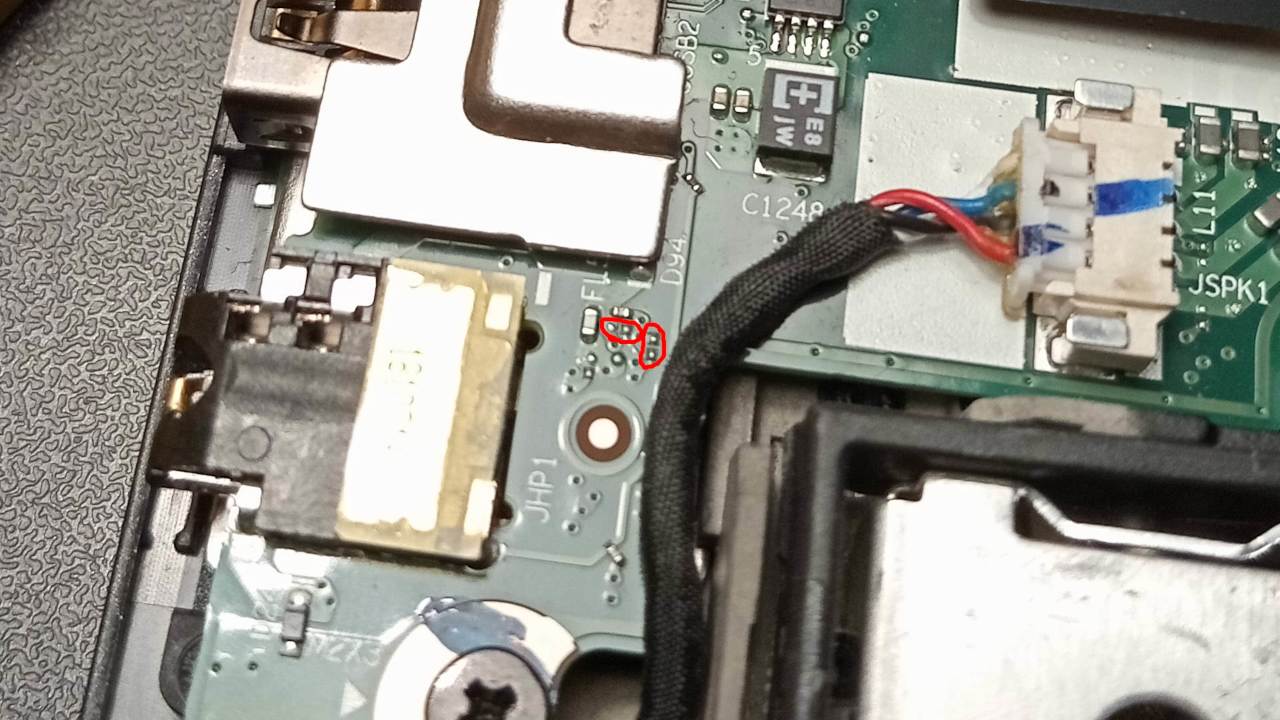

You will solder zero-ohm jumpers on the indicated footprints. These correspond to TX and RX, which are connected to the R and L lines on the headphone jack, respectively; a ground will also be available.
You must solder the zero-ohm jumpers, for UART to work. They are 0201 type jumpers, which are extremely small. Please only do this if you have excellent soldering skills because it's easy to goof this up if you're not careful.
You can hook this up to any 3.3v TTL UART dongle, to get a serial console. The correct baud rate is 115200.
Idea for 2nd NVMe mod
Interestingly, on boards without the Nvidia graphics, the solder pads for all the componentry (including the GPU) is still present, so you could theoretically design a QSB that solders to the right pads, and use it to wire a 2nd NVMe SSD; the port is still enabled in Libreboot even if nothing is plugged into it, so it should just work. (this doesn't actually exist yet, but it is electrically possible, quite feasible to design/manufacture and already supported in the Libreboot firmware in principle, since than PCI-E lane is enabled in the devicetree)
Mate Kukri came up with this idea. It's a great idea, so it's written here. This mod is possible on both the T480 and T480s, though on T480s there would be less clearance; using a smaller internal battery and having a makeshift NVMe caddy in the remaining space would be how to go about it there. On the regular T480, the existing caddy area could easily fit two NVMe drives.
Errata
Some features either don't work, or are untested, when running Libreboot on the ThinkPad T480 or T480s.
Power-on after power failure
Older Libreboot revisions made this machine always turn on, when plugging in a power supply (charger brick), if a previous power loss was observed. This is because coreboot sets a special register in the PMC that configures such behaviour, but it was hardcoded to always-on. This is undesirable for most people, so Libreboot 20241206 revision 8 and newer releases contain the following modification:
https://browse.libreboot.org/lbmk.git/commit/?id=09a01477df67e3ddc36e11123c537332d7813c50
If you wish to modify this behaviour again, you could modify the patch
referenced there; the actual location of the .patch file may change over
time, so you can basically just modify the coreboot source file
at src/soc/intel/common/block/pmc/pmclib.c (for the coreboot tree
under src/coreboot/ in lbmk, pertaining to your board, which can be determined
by reading the tree variable in your board's target.cfg file within lbmk).
Use the patch as reference, to modify the coreboot behaviour as you wish, and re-compile from source.
TPM disabled
The TPM is disabled on this device, to prevent hanging/boot delay in SeaBIOS, due to buggy TPM drivers there.
Legacy 8254 timer
Legacy 8254 timer enabled in coreboot, to prevent SeaBIOS from hanging.
HyperThreading on T480/T480s
Also called SMT. This is a feature where you get 2 threads on a single core. It can improve performance in some workloads, but is actually a performance liability in others, depending on your OS kernel/scheduler and the actual workload.
It is a security liability, due to the Spectre/Meltdown attacks, so we recommend turning it off, at the very least from your running operating system. On this platform, you can easily turn it off from coreboot.
Libreboot disables HyperThreading by default, from Libreboot 20241206 rev8 onward, on this board. To turn it back on, please build from source and before running the build command, do this:
./mk -m coreboot t480_vfsp_16mb # replace t480 with t480s if needed
In the menu that appears, go Chipset -> Enable Hyperthreading and turn it on. Then exit from the menu, saving the config where prompted. You will see this menu twice, because there are two configs for each of these boards.
SMT is rarely of benefit in practise, but can be useful in some circumstances. For example, if you're compiling a large codebase from source that takes hours, SMT increases the building speed by about 15 percent; for example, a 3 hour build job might take about 2 hours and 40 minutes instead.
NFC support in T480
Some T480 models might have NFC support but this is untested in Libreboot, and probably dosen't work in current Libreboot releases.
The PCH's NFC device is unsupported in Linux anyway.
Smartcard reader
The smartcard reader is enabled but it is still untested. If you have one, please test it and report back to the Libreboot project.
Thunderbolt not supported yet
Thunderbolt is a way to get PCI-E on a USB port. With it, you can use high-bandwidth devices such as 10Gbps network interfaces.
The thunderbolt controller is currently unconfigured, so you can't use Thunderbolt, but the thunderbolt and regular USB-C connector can both be used for charging, and both can be used for video output (it shows up in xrandr as a DisplayPort).
This patch can be added, enabling Thunderbolt, but be warned: it is completely untested, as of Libreboot 20241206. This patch is NOT included in the release, because it breaks on S3 resume, and may cause a kernel panic. Also: currently testing only reveals that the ThunderBolt controller shows up.
You also need the gerrit patch adding a Thunderbolt driver to coreboot.
To apply these patches, do the following in a fresh clone of lbmk.git and do:
git checkout 20241206-t480-thunderbolt-unstable
In it, you'll find this commit:
commit 3881160b863ff53df9064a29a25aab55c76ee9c4 (HEAD -> 20241206-t480-thunderbolt-unstable)
Author: Leah Rowe <leah@libreboot.org>
Date:   Tue Dec 10 23:35:47 2024 +0000

    experimental/unstable t480 thunderbolt support

    Signed-off-by: Leah Rowe <leah@libreboot.org>
This was created by the following steps, applying the patches referenced above and amending the coreboot configs for T480/T480s, within lbmk, from a fresh clone of lbmk (Git repository):
git reset --hard b910424b5df8ed7c931a7b8f5cc8e34eacf0ca3e # 20241206rev2
./mk -f coreboot next
cd src/coreboot/next
wget https://libreboot.org/docs/install/t480-thunderbolt-20241206-unstable.patch
git fetch https://review.coreboot.org/coreboot refs/changes/86/75286/12 && git cherry-pick FETCH_HEAD
git am t480-thunderbolt-20241206-unstable.patch
git format-patch -n2
mv 0001-drivers-intel-dtbt-Add-discrete-Thunderbolt-driver.patch ../../../config/coreboot/next/patches/0010-drivers-intel-dtbt-Add-discrete-Thunderbolt-driver.patch
mv 0002-thunderbolt-fix-ish.patch ../../../config/coreboot/next/patches/0011-thunderbolt-fix-ish.patch
cd -
./mk -u coreboot t480s_fsp_16mb
./mk -u coreboot t480_fsp_16mb
git add config/coreboot/next/patches/
git add config/coreboot/t480_fsp_16mb/
git add config/coreboot/t480s_fsp_16mb/
git commit -s -m "experimental/unstable t480 thunderbolt support"
NOTE: With the above change, or if using the branch referenced below,
the build targets will be t480_fsp_16mb and t480s_fsp_16mb,
not t480_vfsp_16mb and t480s_vfsp_16mb; see notes regarding fsp/vfsp
elsewhere on this page. This branch also does not contain other fixes from
Libreboot 20231206 rev8/newer, since it's based on 20241206 rev2. A rebase will
not be conducted; instead, ThunderBolt PCI-E support will simply be added in
a subsequent release, and revision to the 20241206 release.
You can now follow standard build instructions.
The branch named 20241206-t480-thunderbolt-unstable already has the above
patches applied, including the configuration changes made by ./mk -u, and
you can follow the same build instructions. In this lbmk branch, that
gerrit patch above (refs/changes/86/75286/12) is already included.
Whether you use the lbmk branch, or you add the patches manually as above, you can then flash the resulting image and boot it.
AGAIN: This will likely cause kernel panics, and it will break on resume from S3 (resume from sleep). If you do test this, please report whether the Thunderbolt devices actually work, but remember that you must NOT suspend or put your machine to sleep.
Nvidia dGPU not supported
Nvidia dGPU doesn't work and is disabled as of 6 December 2024; the Intel graphics are still available even on Nvidia models, so Intel graphics are used.
WWAN slot untested.
thinkpad_acpi issues
It has been reported that thinkpad_acpi does not load correctly on the T480.
This should also be the case for the T480s.
If you encounter this issue, check
this page
for details as to how to fix this.